

I often cringe when I see the responses to a forum post on how to carry a Sony 70-200mm f/2.8 or Sony 100-400mm. People seem completely oblivious to the damage they are doing to the mounts on their cameras. Worst yet, they are happily advising other users to do the same.
How do you know whether to reconsider how you carry your camera/lens combination? If it comes with a lens collar that allows for attachment directly to the lens, the rule of thumb is to use the lens attachment as these lenses are likely to be heavier than the camera body.
Carrying a lens the wrong way doesn’t guarantee your camera will get damaged, but it simply increases the risk of the damage occurring. In many cases, changing the way you carry won’t have additional cost implications, it may just result in some changes to the attachment points you use.
I’ll try to cover both the holster and strap options but if you think I’ve missed any right ways, feel free to let me know and I’ll try edit it to include them.
These are the wrong ways to carry it
Yes, there are wrong ways to carry a big lens and they aren’t related to comfort. Why? Because it’s a method that is likely to damage the lens mount over an extended period of time. The vast majority of mounts, whilst fairly robust are simply not designed to have the weight of a big lens pulling outwards for an extended period and even a minor change can result in problems, either with focus accuracy or sharpness across the frame amongst other problems. This is one of the reasons people are always advised to use the tripod collar to mount any strap when using a big lens.
The weight of a camera like the A7 is 650 grams, give or take a few grams. The weight of the 100-400 lens is 1.4kg’s, nearly 2.5 times the weight. The problem isn’t just the weight. Carrying the lens requires you to move. Moving means the camera and lens also moves and this adds extra pressure on the mount.
There are many examples on the camera forums of people who have damaged lens mounts and I have no reason to doubt that these occurred through normal carrying. In many cases, I don’t think the owners are to blame. I think they are simply guilty of receiving bad advice on how to carry long lenses which I have tried to address in this article.

An example of a damaged mount from dpreview where the owner claims that he had not dropped the lens
The incorrect strap way
This is the most common way, or the most common incorrect way. I think this occurs as many of the culprits already have a strap attached to their cameras so when they buy a larger lens, they simply attach the new lens, none the wiser to the potential damage, other than the sore neck that comes with carrying a big lens that way. I’ve actually seen a photo of about 10 cameras, nicely lying on the grass as part of a group outing, all setup incorrectly with a neck strap. As you can see from this photo, the strap is attached to the camera itself.

The wrong holster way
This is an example of the wrong holster way. There are multiple examples shown on the Peak Design website although I don’t believe they do a good job of recommending the use of lens mounts.
This example is the example of the wrong way to attach a long lens, I’m not sure why Peak Design show this on their website, would have expected better from a holster manufacturer. This is not a Peak Design product problem, but rather the application of the product, it’s important to understand the difference between the two. Problem may not be obvious, but the lens attachment in this case is on the body, instead of the lens. This results in the full weight of the lens hanging off the body, instead of the weight of the camera being on top of the lens which puts almost no strain on the mount:

Photo example showing the way I would recommend avoiding from Peak Design Support Page where the plate is attached to the camera instead of the lens
The Right Strap ways
The right way to carry it – The sling strap attached to the lens
The first option you have is the use of a sling strap. There are a number of different brands, they all do the same thing in different ways. The brands you can consider are:
These are not a conclusive list of all the shoulder straps available, I’ve picked a variety of different styles, there are probably 20 others and about 50 handmade ones you can find on ETSY that make similar shoulder straps in leather to the Holdfast. There is no best, just what’s best for you, the key being how comfortable the strap is to wear, and what you can afford because they range in price considerably.
The process for attaching the strap is relatively simple:
- Most of these styles of straps are provided with an attachment of some form that allows you to attach it to a tripod screw on the bottom of the camera or lens. Attach this to the bottom of the lens plate. If you want to use an area plate, I’ll cover that option later
- Once the ring is attached to the bottom of the lens, it’s a simple case of attaching the strap.
At this point, the lens will hang upside down from the lens, with minimal pressure on the mount as the lightest weight (the camera) is on the mount.

The right way to carry it – Part 2
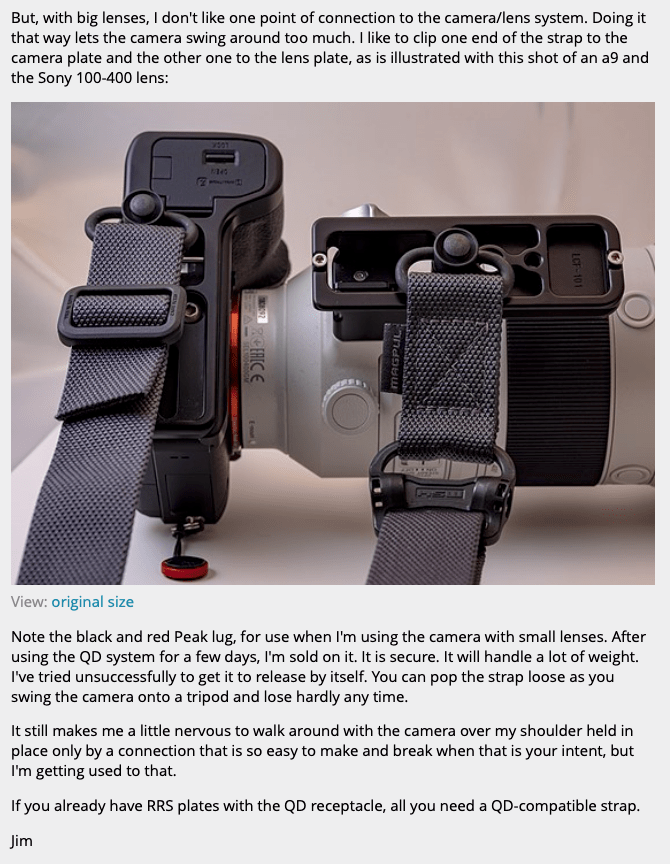
The second is much like the first however the primary difference in this case is that we are relying on two attachment points for the strap, one of which attached to the lens foot, and the second of which attaches to the camera itself.
This does limit the type of strap you can use as it as more suited to conventional strap styles although they need to be a little longer than a neck strap. As an example, of the above, only the Peak Design Or Magpul will be suited to this arrangement.
The post from JimKasson shows this method here
Note 1: Using an arca swiss plate on your lens with a strap
One of the challenges you may have is the use of an arca swiss plate on your lens. This normally occurs if you have a lens you use regularly on a monopod or tripod.
There are one of three ways to address this:
- Flat ring – Most arca swiss plates will allow you to attach something to the bottom, but the typical problem is the standard ring attachment sticks out meaning you can’t use the plate on a tripod clamp. I don’t know about you, but I’m pretty lazy, so one of the solutions is a ring connection that flattens offered by some of the manufacturer’s, the Black Rapid example is shown. Cost is around $15 depending on what you are buying.
- The arca clamp option – This option involves the use of an arca clamp. These can be purchased anywhere for about $20 to $50 depending on the quality and brand. If you go with a Magpul strap through RRS, you can get a clamp that is compatible with the QD attachment . There is also a clamp option from Spiderpro which I’ll cover under hybrid options.
- Arca plates with built in attachment points for straps – There are a number of arca swiss plate options with built in attachment points. Fusion plate was one of the first I saw on the market. If they seem expensive, there are some other options around but I can’t personally vouch for any of them as I don’t personally use them (or the fusion plate). Alternatively you can buy a lens foot that incorporates a strap attachment point like the RRS version for the 100-400.

This is a spider arca clamp, but you can achieve the same outcome with any arca clamp you purchase online.
The following example shows an plate from Peak Design with the strap connector already incorporated into the bottom so it doesn’t impact use of the plate on a tripod

Note 2: Dealing with the risk of a failing strap
Some people may have concerns of the strap falling. It’s not an irrational fear given the camera is attached to a single point.
There are easy ways to address this with what is referred to as a camera tether, and some strap manufacturers like Joby provide this as a standard inclusion with their strap. They also sell it separately of you prefer another brand.

An image from the Joby website showing their camera tether which is available for about $8
If this is something you are concerned about, I’d recommend a tether. You can make one on your own, but when you consider the cost for the Joby version ($8), you’d probably be more out of pocket with making your own.
The right holster ways
There are multiple right holster ways depending on the holster you buy. For the purposes of this article, I’ll cover the Spiderpro and Peak Design which are two of the more popular options. For all intensive purposes, both options still have one thing in common, the mount should be on the lens, not the camera.
Peak Design Right Way
As you can see from this graphic, the mount for the peak design should be attached to the foot of the lens, not on the camera. This takes all potential strain off the camera and any mild knocks won’t result in extended pressure on the mount as the body is sitting on top of the lens, not the lens hanging from the body.
Although this shows a strap and a plate, this example from a Fred Miranda forum shows the correct placement of the peak design plate on the lens, not the camera

Spiderpro Right way
Here is a photo from Spiderpro’s website showing the correct attachment of a plate to the foot of the camera lens. This is the preferred or lower risk method of attaching a spiderpro.

My Hybrid Solution – The best of both worlds (for me at least)
One of the questions I see constantly raised is the question of “straps or holsters”. I don’t believe you should have to choose between the two if you approach it in the right way. I still think you can have the best of both worlds (if costs allow) and use the two together at the same time, or separately if required.
Holsters tend to be great up to a point, but when you throw big lenses on them, you feel like a mechanic wearing a tool belt for extended carry, even if you have a decent belt. If you use the belt option they give you as an option with the holster, you look like you’re a cowboy on your way to a gunslinger meet up.
On the strap front, straps are great but they leave a camera and lens swinging around when you move around or bend over, so I find you’re constantly having to hold them. They also get heavy after a way and your shoulders can take some strain. They do offer an advantage of being easier to swap cameras so that does offer some benefits in speed.
So what is my proposal?
I use a combination of SpiderPro Arca clamp, and Black Rapid. You can do this with any single or double shoulder strap, whether it’s something like a Holdfast Moneymaker or Peak Design sling strap, but the holster option would be confined to the use of a Spiderpro Holster over a Peak Design version.
This combination gives you the best of both worlds, a holster when you need a holster, a strap when you need a strap and the combination of both when you need both together.
To do that you’ll need the following:
- Arca Swiss plate attached to each camera, battery grip, or lens depending on the size of the lens. The nice thing with this approach is as long as you have an arca plate, it will work along with any arca plate which are available fairly cheaply.
- Spiderpro spider clamp – one or two depending on the number of cameras
- Spiderpro Holster – either the spider light version or the full SpiderPro. You won’t need the spider plate as the clamp will allow you to work without it, so I would recommend buying only the clamp and holster if you have the option.
- Black Rapid or similar single or dual strap that attaches via the tripod screw at the bottom. There are plenty of options in the market so this really comes own to personal preference. Make sure it’s one where the attachment point is removable from the camera.
- Joby Camera Tether for Pro Sling Strap (if you want an additional safety net in case something goes wrong) – This isn’t the only option, but it’s the cheapest I could find.
Setting it up
Setting up to use the strap and holster is actually quite easy:
- Ensure you have the arca swiss plate attached to the camera or grip. For some cameras like the X-E3, the grip incorporates an area swiss plate.
- Remove the tripod screws from the strap and attach them to the SpiderPro are a clamp. I found the BlackRapid screws seem to sit perfectly but some of the longer screw don’t screw all the way in so you may need a rubber washer.

This won’t impact the use of the clamp on the holster.
How to use it
Using this setup is quite easy:
- Remove the attachment screw from the black rapid and attach it to the bottom of the SpiderPro clamp. You now have a clamp that can be attached to the Black Rapid
- Attach the arca clamp to the arca plate on the bottom of your camera. You now have an attachment point at the bottom of the camera which allows you attach your BlackRapid strap, but it’s not just a strap attachment, but a holster attachment as well.
- If you’re not comfortable with the stability, you could add an additional tether per above
Using the strap alone means attaching the clamps to your straps and wearing them. Using the holster means using the clamps as is with the holster.

Using them in combination is where the real value comes in. You can hang the straps loose when you want to, or attach them to the holster when you want some stability.
The example below shows the holster in use supporting the camera with very little weight on the straps

Depending on the length you setup on the strap, you can either have the weight on your shoulders, your belt, or both. You can also switch between them by adjusting the strap or leaving the cameras hanging.
For this example I have moved the holster aside to show only the strap is in use.


This is a really helpful guide, and very nice page, thanks 🙂 One suggestion I would make is it helps keep your users glued to your page if you have your links to other sites open in a new tab
LikeLike
Will do. Thanks for the feedback.
LikeLike
Thanks so much for posting this article. It is exactly what I needed after recently purchasing a Sony 100-400 mm lens. I already owned a Black Rapid sling strap, but I was concerned that my camera and lens were suspended upside down when hanging from the strap. My thought was that the threaded nut on the tripod mount might give way over time. Your article made me realize that this is not an issue. I will, however, purchase a Joby camera tether per your recommendation. While the holster is a great idea, it doesn’t really work for the types of shorts I consistently wear living in Florida. Given this, I will generally hold the lens by the tripod mount to keep the camera still while I am walking. Thanks again!
LikeLike
Hi – There are a few broken links and images now
LikeLike
Thanks, Max. I’ll fix these.
LikeLike